En esta entrada vamos a explicar cómo crear un data guard de forma sencilla a través del service name.
Antes de comenzar a explicar los pasos, los siguientes prerequisitos se han completado:
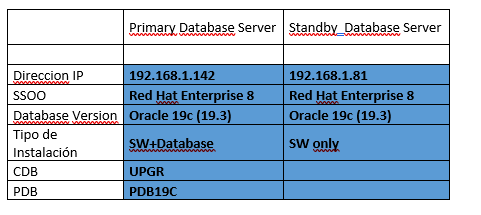
Dos servidores preprados con Oracle 19c(19.3). En el servidor principal (oracle21) se ha creado una base de datos CDB con una PDB, mientras en el servidor secundario (oracle21dg) únicamente se ha instalado Oracle software, sin base de datos. En ambos servidores el almacenamiento configurado es ASM.
PRIMARY DATABASE
1. Poner la base de datos en modo force logging.
Se recomienda forzar la base de datos a logging para que todos los cambios de la base de datos se repliquen en nuestra base de datos en espera, independientemente de la configuración de los objetos en «nologging»
Para ello ejecutamos:
alter database force logging;
oracle@oracle21> sqlplus / as sysdba
SQL*Plus: Release 19.0.0.0.0 – Production on Tue May 12 19:12:24 2026
Version 19.3.0.0.0
Copyright (c) 1982, 2019, Oracle. All rights reserved.
Connected to:
Oracle Database 19c Enterprise Edition Release 19.0.0.0.0 – Production
Version 19.3.0.0.0
SQL> alter database force logging;
Database altered.
SQL> exit
Disconnected from Oracle Database 19c Enterprise Edition Release 19.0.0.0.0 – Production
Version 19.3.0.0.0
oracle@oracle21>
2. Creación de los standby redo logs.
Ahora creamos los redo logs que permiten la aplicación de rehacer en tiempo real.
Buenas prácticas de los redo logs;
- Que los standby redo logs tengan el mismo tamaño que los redo logs.
- Tener tantos grupos asignados a un hilo de configuración RAC
- Que sean grupos de un sólo miembro.
- Tener el mismo número número de grupos por hilo que los redo logs groups.
Chequeamos los redo logs existentes y su tamaño (primary).
select thread#,group#,bytes/1024/1024 MB, status from v$log;
oracle@oracle21> sqlplus / as sysdba
SQL> select thread#,group#,bytes/1024/1024 MB, status from v$log;
THREAD# GROUP# MB STATUS
————————————————————
1 1 200 INACTIVE
1 2 200 CURRENT
1 3 200 INACTIVE
En este caso tenemos 3 grupos, por un sólo thread# y el tamaño de cada uno son 200MB.
Ejecutamos la siguiente sentencia.Se recomienda crear un redo log standby más, que los ficheros de redo logs. Por tanto 4xthread ficheros de redo logs standby de 200M.
alter database add standby logfile thread 1
group 7 (‘+DATA’) size 209715200,
group 8 (+’DATA’) size 209715200,
group 9 (‘+DATA’) size 209715200,
group 10 (‘+DATA’) size 209715200;
Comprobamos que se han creado correctamente.
select THREAD#,a.GROUP#,member from v$standby_log a,
v$logfile b where a.GROUP#=b.GROUP# order by 1,2,3; 2
THREAD # GROUP # MEMBER
———— —————- ————————————————————————
1 7 +DATA/UPGR/ONLINELOG/group_7.260.1233147371
1 8 +DATA/UPGR/ONLINELOG/group_8.289.1233150865
1 9 +DATA/UPGR/ONLINELOG/group_9.287.1233147383
1 10 +DATA/UPGR/ONLINELOG/group_10.288.1233147399
3. Enable Standby File Management
Nos aseguramos que en la base de datos el parámetro STANDBY_FILE_MANAGEMENT está en AUTO.
SQL> alter system set STANDBY_FILE_MANAGEMENT=AUTO scope=both ;
System altered.
SQL> show parameter STANDBY_FILE_MANAGEMENT
NAME TYPE VALUE
———————————— ———– ——————————
standby_file_management string AUTO
SQL>
3. Copiamos el fichero de password
Copiamos el fichero de password de la base de datos primary a la standby.
Buscamos el fichero de password en la primary:
oracle@oracle21> srvctl config database -d UPGR | grep contraseña
Archivo de contraseña: +DATA/UPGR/PASSWORD/orapwUPGR
Sacamos el fichero de password de ASM para poder enviarlo al servidor de standby.
asmcmd cp +FRA/TESTING/PASSWORDFILE/orapwtesting /tmp
Enviamos el fichero de password al servidor de standby.
oracle@oracle21> scp orapwUPGR oracle@oracle21dg:/tmp
oracle@oracle21dg’s password:
orapwUPGR 100% 2048 780.9KB/s 00:00
oracle@oracle21dg> cp orapwUPGR /opt/oracle/product/19c/dbhome_1/dbs/orapwUPGRDG
4. Creamos un fichero pfile para la standby sacada del fichero pfile de la primary y scp a la standby.
oracle@oracle21> scp initUPGR.ora oracle@oracle21dg:/tmp
oracle@oracle21dg’s password:
initUPGR.ora
5.Modificamos el fichero PFILE en la base de datos standby
Creamos la estructura necesaria:
mkdir -p /opt/oracle/admin/UPGRDG/adump
En nuestro caso las modificaciones son mínimas. Cambiamos UPGR por UPGRDG.

Importante: el db_name debe de ser el mismo, cambiando el db_unique_name.
oracle@oracle21dg> cat UPGRDG.ora
OLD_ORACLE_BASE=/opt/oracle
ORACLE_BASE=/opt/oracle
ORACLE_HOME=/opt/oracle/product/19c/dbhome_1
ORACLE_SID=UPGRDG
export ORACLE_BASE
export ORACLE_HOME
export ORACLE_SID
PATH=/home/oracle/.local/bin:/home/oracle/bin:/usr/local/bin:/usr/local/sbin:/usr/bin:/usr/sbin:/opt/oracle/product/19c/dbhome_1/bin
TNS_ADMIN=/opt/oracle/product/19c/dbhome_1/network/admin
export TNS_ADMIN
export ORACLE_UNQNAME=UPGRDG
Parámetros de entorno con los que manejamos la base de datos standby.
Levantamos standby la base de datos en modo nomount con el pfile creado anteriormente.
Paramos la base de datos, la registramos en el cluster y la levantamos en modo nomount.

Antes de continuar vamos a registrar nuestra nueva base de datos standby en el cluster.
oracle@oracle21dg> srvctl add database -d UPGRDG -oraclehome /opt/oracle/product/19c/dbhome_1 -diskgroup DATA,FRA -role physical_standby -pwfile +DATA/UPGRDG/PASSWORD/orapwUPGRDG -spfile +DATA/UPGRDG/PARAMETERFILE/spfileUPGRDG
Levantamos la base de datos modo, nomount.
oracle@oracle21dg> srvctl start database -d UPGRDG -o nomount
6. Creamos los tnsnames.ora que apunten a los dos servidores
En los dos servidores, debemos de tener las entradas tanto a la base de datos primary cómo standby.
oracle@oracle21dg> cat tnsnames.ora
PRIMARY =
(DESCRIPTION =
(ADDRESS = (PROTOCOL = TCP)(HOST = 192.168.1.142)(PORT = 1521))
(CONNECT_DATA =
(SERVER = DEDICATED)
(SERVICE_NAME = UPGR)
)
)
STANDBY =
(DESCRIPTION =
(ADDRESS = (PROTOCOL = TCP)(HOST = 192.168.1.81)(PORT = 1521))
(CONNECT_DATA =
(SERVER = DEDICATED)
(SERVICE_NAME = UPGRDG)
)
)
Comprobamos en ambos servidores que podemos conectarnos a cada una de las bases de datos que tenemos en nuestros servidores.
oracle@oracle21> sqlplus sys/***@PRIMARY as sysdba
SQL*Plus: Release 19.0.0.0.0 – Production on Wed May 13 18:58:30 2026
Version 19.3.0.0.0
Copyright (c) 1982, 2019, Oracle. All rights reserved.
Connected to:
Oracle Database 19c Enterprise Edition Release 19.0.0.0.0 – Production
Version 19.3.0.0.0
SQL> exit
Disconnected from Oracle Database 19c Enterprise Edition Release 19.0.0.0.0 – Production
Version 19.3.0.0.0
oracle@oracle21> sqlplus sys/***@STANDBY as sysdba
SQL*Plus: Release 19.0.0.0.0 – Production on Wed May 13 18:58:41 2026
Version 19.3.0.0.0
Copyright (c) 1982, 2019, Oracle. All rights reserved.
Connected to:
Oracle Database 19c Enterprise Edition Release 19.0.0.0.0 – Production
Version 19.3.0.0.0
7. Restauramos el controlfile en la standby
El pimer paso es restaura el controlfile apuntando al servicio de la base de datos primaria.
Para ello tengo este script que puedes aplicar a tu base de datos
Creamos el script 01-restore_controlfile.sh, y lo ejecutamos.
srvctl stop database -d $ORACLE_UNQNAME -o abort
rman target / << EOF
run{
startup nomount
restore standby controlfile from service «PRIMARY»;
}
exit
EOF
srvctl stop database -d $ORACLE_UNQNAME -o abort
srvctl start database -d $ORACLE_UNQNAME -o mount
oracle@oracle21dg> sh -x ./01-restore_controlfile.sh
+ srvctl stop database -d UPGRDG -o abort
PRCC-1016 : Ya se ha parado UPGRDG
+ rman target /
Recovery Manager: Release 19.0.0.0.0 - Production on Fri May 15 05:16:12 2026
Version 19.3.0.0.0
Copyright (c) 1982, 2019, Oracle and/or its affiliates. All rights reserved.
connected to target database (not started)
RMAN> 2> 3> 4>
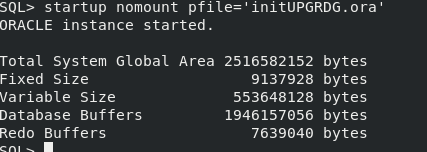
Oracle instance started
Total System Global Area 2516582152 bytes
Fixed Size 9137928 bytes
Variable Size 553648128 bytes
Database Buffers 1946157056 bytes
Redo Buffers 7639040 bytes
Starting restore at 15-MAY-26
using target database control file instead of recovery catalog
allocated channel: ORA_DISK_1
channel ORA_DISK_1: SID=44 device type=DISK
channel ORA_DISK_1: starting datafile backup set restore
channel ORA_DISK_1: using network backup set from service PRIMARY
channel ORA_DISK_1: restoring control file
channel ORA_DISK_1: restore complete, elapsed time: 00:00:06
output file name=+DATA/UPGRDG/CONTROLFILE/control01.ctl
output file name=+FRA/UPGRDG/CONTROLFILE/control02.ctl
Finished restore at 15-MAY-26
RMAN>
Recovery Manager complete.
+ srvctl stop database -d UPGRDG -o abort
PRCC-1016 : Ya se ha parado UPGRDG
+ srvctl start database -d UPGRDG -o mount
8. Restauramos la base de datos a través del service name.
Para ello vamos a crear otro script. 02_restore_db.sh. Las bases de datos deben estar en modo archivelog.
¡¡Importante!!. Si tu base de datos está en encriptada con tde, deberás copiar el tde de la base de datos primary a la standby antes de lanzar el restore.
rman target sys/***@STANDBY << EOF
run{
allocate channel c1 type disk;
allocate channel c2 type disk;
allocate channel c3 type disk;
allocate channel c4 type disk;
allocate channel c5 type disk;
restore database from service «PRIMARY» section size 100G;
switch datafile all;
}
exit
EOF
srvctl status database -d $ORACLE_UNQNAME
<pre>oracle@oracle21dg> sh -x ./02_restore_db.sh
+ rman target sys/oracle@STANDBY
Recovery Manager: Release 19.0.0.0.0 - Production on Fri May 15 06:10:06 2026
Version 19.3.0.0.0
Copyright (c) 1982, 2019, Oracle and/or its affiliates. All rights reserved.
connected to target database: UPGR (DBID=369639787, not open)
RMAN> 2> 3> 4> 5> 6> 7> 8> 9>
using target database control file instead of recovery catalog
allocated channel: c1
channel c1: SID=42 device type=DISK
allocated channel: c2
channel c2: SID=1 device type=DISK
allocated channel: c3
channel c3: SID=45 device type=DISK
allocated channel: c4
channel c4: SID=44 device type=DISK
allocated channel: c5
channel c5: SID=52 device type=DISK
Starting restore at 15-MAY-26
channel c1: starting datafile backup set restore
channel c1: using network backup set from service PRIMARY
channel c1: specifying datafile(s) to restore from backup set
channel c1: restoring datafile 00001 to +DATA/UPGR/DATAFILE/system.271.1233295843
channel c1: restoring section 1 of 1
channel c2: starting datafile backup set restore
channel c2: using network backup set from service PRIMARY
channel c2: specifying datafile(s) to restore from backup set
channel c2: restoring datafile 00003 to +DATA/UPGR/DATAFILE/sysaux.266.1233295845
channel c2: restoring section 1 of 1
channel c3: starting datafile backup set restore
channel c3: using network backup set from service PRIMARY
channel c3: specifying datafile(s) to restore from backup set
channel c3: restoring datafile 00004 to +DATA/UPGR/DATAFILE/undotbs1.260.1233295849
channel c3: restoring section 1 of 1
channel c4: starting datafile backup set restore
channel c4: using network backup set from service PRIMARY
channel c4: specifying datafile(s) to restore from backup set
channel c4: restoring datafile 00005 to +DATA/UPGR/51692FD4BC27283DE065000000000001/DATAFILE/system.259.1233295861
channel c4: restoring section 1 of 1
channel c5: starting datafile backup set restore
channel c5: using network backup set from service PRIMARY
channel c5: specifying datafile(s) to restore from backup set
channel c5: restoring datafile 00006 to +DATA/UPGR/51692FD4BC27283DE065000000000001/DATAFILE/sysaux.273.1233295901
channel c5: restoring section 1 of 1
channel c3: restore complete, elapsed time: 00:01:36
channel c3: starting datafile backup set restore
channel c3: using network backup set from service PRIMARY
channel c3: specifying datafile(s) to restore from backup set
channel c3: restoring datafile 00007 to +DATA/UPGR/DATAFILE/users.272.1233295949
channel c3: restoring section 1 of 1
channel c3: restore complete, elapsed time: 00:00:50
channel c3: starting datafile backup set restore
channel c3: using network backup set from service PRIMARY
channel c3: specifying datafile(s) to restore from backup set
channel c3: restoring datafile 00008 to +DATA/UPGR/51692FD4BC27283DE065000000000001/DATAFILE/undotbs1.265.1233296003
channel c3: restoring section 1 of 1
channel c3: restore complete, elapsed time: 00:01:45
channel c3: starting datafile backup set restore
channel c3: using network backup set from service PRIMARY
channel c3: specifying datafile(s) to restore from backup set
channel c3: restoring datafile 00009 to +DATA/UPGR/5169EC3316F93919E065000000000001/DATAFILE/system.270.1233296115
channel c3: restoring section 1 of 1
channel c4: restore complete, elapsed time: 00:04:30
channel c4: starting datafile backup set restore
channel c4: using network backup set from service PRIMARY
channel c4: specifying datafile(s) to restore from backup set
channel c4: restoring datafile 00010 to +DATA/UPGR/5169EC3316F93919E065000000000001/DATAFILE/sysaux.269.1233296135
channel c4: restoring section 1 of 1
channel c5: restore complete, elapsed time: 00:04:23
channel c5: starting datafile backup set restore
channel c5: using network backup set from service PRIMARY
channel c5: specifying datafile(s) to restore from backup set
channel c5: restoring datafile 00011 to +DATA/UPGR/5169EC3316F93919E065000000000001/DATAFILE/undotbs1.268.1233296153
channel c5: restoring section 1 of 1
channel c2: restore complete, elapsed time: 00:06:55
channel c2: starting datafile backup set restore
channel c2: using network backup set from service PRIMARY
channel c2: specifying datafile(s) to restore from backup set
channel c2: restoring datafile 00012 to +DATA/UPGR/5169EC3316F93919E065000000000001/DATAFILE/users.267.1233296263
channel c2: restoring section 1 of 1
channel c5: restore complete, elapsed time: 00:02:06
channel c2: restore complete, elapsed time: 00:00:44
channel c3: restore complete, elapsed time: 00:03:39
channel c1: restore complete, elapsed time: 00:08:36
channel c4: restore complete, elapsed time: 00:03:48
Finished restore at 15-MAY-26
released channel: c1
released channel: c2
released channel: c3
released channel: c4
released channel: c5
RMAN>
Recovery Manager complete.
+ srvctl status database -d UPGRDG
La base de datos no se está ejecutando.
</pre>
9. Clear logfile
Se limpian todos los redo logs y los standby redo logs para ajustarlos a la nueva base de datos (standby),
Creamos un fichero 03-clear_online.sql y lo ejecutamos en la base de datos standy.
begin
for log_cur in ( select group# group_no from v$standby_log )
loop
execute immediate ‘alter database clear logfile group ‘||log_cur.group_no;
end loop;
end;
/
SQL> @03_clear_online.sql

PL/SQL procedure successfully completed.

/
PL/SQL procedure successfully completed.
9. Configuración Data Broker
Para centralizar y simplificar un entorno Data Guard, es muy recomendable configurar Oracle Data Guard Broker. En caso contrario todas las gestiones deberán ser realizadas de forma manual.
Standby
alter system set dg_broker_config_file1=’+DATA/UPGRDG/dr1.dat’ scope=both sid=’*’;
alter system set dg_broker_config_file2=’+FRA/UPGRDG/dr2.dat’ scope=both sid=’*’;
SQL> show parameter broker

NAME				     TYPE	 VALUE
------------------------------------ ----------- ------------------------------
connection_brokers		     string	 ((TYPE=DEDICATED)(BROKERS=1)),
						  ((TYPE=EMON)(BROKERS=1))
dg_broker_config_file1		     string	 /opt/oracle/product/19c/dbhome
						 _1/dbs/dr1UPGR.dat
dg_broker_config_file2		     string	 /opt/oracle/product/19c/dbhome
						 _1/dbs/dr2UPGR.dat
dg_broker_start 		     boolean	 FALSE
use_dedicated_broker		     boolean	 FALSE
SQL> alter system set dg_broker_config_file1='+DATA/UPGRDG/dr1.dat' scope=both sid='*';

alter system set dg_broker_config_file2='+FRA/UPGRDG/dr2.dat' scope=both sid='*';
System altered.

SQL> SQL>

System altered.

SQL> show parameter broker

NAME				     TYPE	 VALUE
------------------------------------ ----------- ------------------------------
connection_brokers		     string	 ((TYPE=DEDICATED)(BROKERS=1)),
						  ((TYPE=EMON)(BROKERS=1))
dg_broker_config_file1		     string	 +DATA/UPGRDG/dr1.dat
dg_broker_config_file2		     string	 +FRA/UPGRDG/dr2.dat
dg_broker_start 		     boolean	 FALSE
use_dedicated_broker		     boolean	 FALSE
SQL>
Primary
alter system set dg_broker_config_file1=’+DATA/UPGR/dr1.dat’ scope=both sid=’*’;
alter system set dg_broker_config_file2=’+FRA/UPGR/dr2.dat’ scope=both sid=’*’;
SQL> show parameter broker

NAME				     TYPE	 VALUE
------------------------------------ ----------- ------------------------------
connection_brokers		     string	 ((TYPE=DEDICATED)(BROKERS=1)),
						  ((TYPE=EMON)(BROKERS=1))
dg_broker_config_file1		     string	 /opt/oracle/product/19c/dbhome
						 _1/dbs/dr1UPGR.dat
dg_broker_config_file2		     string	 /opt/oracle/product/19c/dbhome
						 _1/dbs/dr2UPGR.dat
dg_broker_start 		     boolean	 FALSE
use_dedicated_broker		     boolean	 FALSE
SQL> alter system set dg_broker_config_file1='+DATA/UPGRDG/dr1.dat' scope=both sid='*';

alter system set dg_broker_config_file2='+FRA/UPGRDG/dr2.dat' scope=both sid='*';
System altered.

SQL> SQL>

System altered.

SQL> show parameter broker

NAME				     TYPE	 VALUE
------------------------------------ ----------- ------------------------------
connection_brokers		     string	 ((TYPE=DEDICATED)(BROKERS=1)),
						  ((TYPE=EMON)(BROKERS=1))
dg_broker_config_file1		     string	 +DATA/UPGRDG/dr1.dat
dg_broker_config_file2		     string	 +FRA/UPGRDG/dr2.dat
dg_broker_start 		     boolean	 FALSE
use_dedicated_broker		     boolean	 FALSE
SQL>
Activamos Oracle DataGuard Broker en ambas bases de datos.
Standby
SQL> alter system set dg_broker_start=true scope=both sid=’*’;
SQL> alter system register;
Primary
SQL> alter system set dg_broker_start=true scope=both sid=’*’;
Registramos las bases de datos en Oeracle DataGuard Broker, de la siguente manera:
Primary: dgmgrl
connect sys/password@PRIMARY as sysdba
CREATE CONFIGURATION dgconfigUPGR AS PRIMARY DATABASE IS UPGR CONNECT IDENTIFIER IS PRIMARY;
ADD DATABASE ‘UPGRDG’ AS CONNECT IDENTIFIER IS ‘STANDBY’;
show configuration;
dgmgrl
DGMGRL for Linux: Release 19.0.0.0.0 – Production on Fri May 15 15:37:59 2026
Version 19.3.0.0.0
Welcome to DGMGRL, type «help» for information.
DGMGRL> connect sys/***@PRIMARY as sysdba
Connected to «UPGR»
Connected as SYSDBA.
DGMGRL> CREATE CONFIGURATION dgconfigUPGR AS PRIMARY DATABASE IS UPGR CONNECT IDENTIFIER IS PRIMARY;
Configuration «dgconfigupgr» created with primary database «upgr»
ADD DATABASE ‘UPGRDG’ AS CONNECT IDENTIFIER IS ‘STANDBY’;
Database «UPGRDG» added
DGMGRL> show configuration
Configuration – dgconfigupgr
Protection Mode: MaxPerformance
Members:
upgr – Primary database
UPGRDG – Physical standby database
Fast-Start Failover: Disabled
Configuration Status:
DISABLED
Antes de poner enable la configuración, es aconsejable reiniciar la base de datos standby.
srvctl stop database -d UPGRDG
srvctl start database -d UPGRDG -o mount
Ahora sólamente queda poner enable la configuración de oracle data guard Broker con enable configuration;
DGMGRL> enable configuration;
Enabled.
Comprobamos que todo es correcto, el estado es SUCCESS.
DGMGRL> show configuration
Configuration – dgconfigupgr
Protection Mode: MaxPerformance
Members:
upgr – Primary database
UPGRDG – Physical standby database
Fast-Start Failover: Disabled
Configuration Status:
SUCCESS (status updated 38 seconds ago)
En esta entrada hemos configurado una base de datos single instance, pero los pasos son válidos para un entorno de RAC, únicamente tendrás que ajustar los valores propios de un RAC en el init.ora, el resto son pasos similares.