In this post explain how data guard create a data guard using the service name.
Before we begin explaining the steps, please ensure that the following prerequisites have been met:
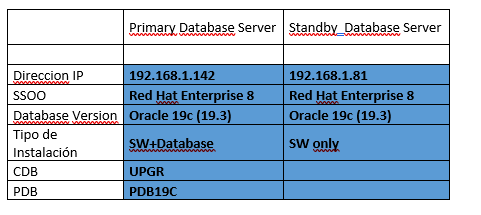
Two servers have been set up with Oracle (19.3). On the primary server (oracle21), a CDB database with a single PDB has been created, while on the secondary server (oracle21dg), only Oracle has been installed, without a database. ASM storage has been configured on both servers.
PRIMARY DATABASE
1. Set the database to force logging mode.
It is recommended to force the database to use logging so that all database changes are replicated to our standby database, regardless of whether the objects are configured as "nologging"
To do this, run the following command: `
` `alter database force logging;`
oracle> sqlplus / as sysdba
SQL*Plus: Release 19.0.0.0.0 – Production on Tue May 12 19:12:24 2026
Version 19.3.0.0.0
Copyright (c) 1982, 2019, Oracle. All rights reserved.
Connected to:
Oracle 19c Enterprise Edition Release 19.0.0.0.0 – Production
Version 19.3.0.0.0
SQL> alter database force logging;
Database altered.
SQL> exit
Disconnected from Oracle 19c Enterprise Edition Release 19.0.0.0.0 – Production
Version 19.3.0.0.0
oracle>
2. Creation of standby redo logs.
Now we create the redo logs that enable real-time rollback.
Best practices for redo logs;
- Ensure that the standby redo logs are the same size as the redo logs.
- Having too many groups assigned to a RAC configuration thread
- Let them be single-member groups.
- Set the number of groups per thread to match the number of redo log groups.
We checked the existing redo logs and their size (primary).
SELECT thread#, group#, bytes/1024/1024 MB, status FROM v$log;
oracle> sqlplus / as sysdba
SQL> select thread#,group#,bytes/1024/1024 MB, status from v$log;
THREAD# GROUP# MB STATUS
————————————————————
1 1 200 INACTIVE
1 2 200 CURRENT
1 3 200 INACTIVE
In this case, we have 3 groups, each with a single thread#, and each group is 200 MB in size.
We execute the following statement. It is recommended to create one more standby redo log file than the number of standby redo log files. Therefore, 4xthread 200MB standby redo log files.
alter database add standby logfile thread 1
group 7 (‘+DATA’) size 209715200,
group 8 (+’DATA’) size 209715200,
group 9 (‘+DATA’) size 209715200,
group 10 (‘+DATA’) size 209715200;
We verify that they have been created correctly.
SELECT THREAD#, a.GROUP#, member FROM v$standby_log a,
v$logfile b WHERE a.GROUP# = b.GROUP# ORDER BY 1, 2, 3; 2
THREAD # GROUP # MEMBER
———— —————- ————————————————————————
1 7 +DATA/UPGR/ONLINELOG/group_7.260.1233147371
1 8 +DATA/UPGR/ONLINELOG/group_8.289.1233150865
1 9 +DATA/UPGR/ONLINELOG/group_9.287.1233147383
1 10 +DATA/UPGR/ONLINELOG/group_10.288.1233147399
3. Enable Standby File Management
We make sure that the STANDBY_FILE_MANAGEMENT parameter is set to AUTO in the database.
SQL> alter system set STANDBY_FILE_MANAGEMENT=AUTO scope=both ;
System altered.
SQL> show parameter STANDBY_FILE_MANAGEMENT
NAME TYPE VALUE
———————————— ———– ——————————
standby_file_management string AUTO
SQL>
3. Copy the password file
We copied the password file password the primary database to the standby database.
We look for the password file password the primary server:
oracle> srvctl config database -d UPGR | grep password
Password file:PASSWORD
We extracted the ASM password file ASM we could send it to the standby server.
asmcmd cp +FRA/TESTING/PASSWORDFILE/orapwtesting /tmp
We sent the password file password standby server.
oracle> scp orapwUPGR oracle:/tmp
oracle password:
orapwUPGR 100% 2048 780.9KB/s 00:00
oracle> cp orapwUPGRoracle
4. We create a pfile for the standby server based on the primary server's pfile and use scp to transfer it to the standby server.
oracle> scp initUPGR.ora oracle:/tmp
oracle password:
initUPGR.ora
5. We modify the PFILE file in the standby database
We set up the necessary structure:
mkdir -poracle
In our case, the changes are minimal. We changed UPGR to UPGRDG.

Important: The ` db_name` must remain the same; only the ` db_unique_name` should be changed.
oracle> cat UPGRDG.ora
oracle
ORACLEoracle
ORACLEoracle
ORACLE
export ORACLE
export ORACLE
export ORACLE
oracle/.local/bin:/oracle:/usr/local/bin:/usr/local/sbin:/usr/bin:/usr/sbin:oracle
oracle
export TNS_ADMIN
export ORACLE
Environment parameters used to manage the standby database.
We bring the database online in nomountmode using the pfile created earlier.
We stop the database, register it with the cluster, and start it in nomount mode.

Before we continue, let's register our new standby database in the cluster.
oracle> srvctl add database -d UPGRDG -oraclehomeoracle-diskgroup DATA,FRA -role physical_standby -pwfilePASSWORD-spfile +DATA/UPGRDG/PARAMETERFILE/spfileUPGRDG
We mounted the database in read-only mode.
oracle> srvctl start database -d UPGRDG -o nomount
6. We create the tnsnames.ora files that point to the two servers
On the two servers, we must have entries for both the primary and standby databases.
oracle> cat tnsnames.ora
PRIMARY =
(DESCRIPTION =
(ADDRESS = (PROTOCOL = TCP)(HOST = 192.168.1.142)(PORT = 1521))
(CONNECT_DATA =
(SERVER = DEDICATED)
(SERVICE_NAME = UPGR)
)
)
STANDBY =
(DESCRIPTION =
(ADDRESS = (PROTOCOL = TCP)(HOST = 192.168.1.81)(PORT = 1521))
(CONNECT_DATA =
(SERVER = DEDICATED)
(SERVICE_NAME = UPGRDG)
)
)
We verified on both servers that we can connect to each of the databases we have on our servers.
oracle> sqlplus sys/***@PRIMARY as sysdba
SQL*Plus
SQL*Plus: Release 19.0.0.0.0 – Production on Wed May 13 18:58:30 2026
Version 19.3.0.0.0
Copyright (c) 1982, 2019, Oracle. All rights reserved.
Connected to:
Oracle 19c Enterprise Edition Release 19.0.0.0.0 – Production
Version 19.3.0.0.0
SQL> exit
Disconnected from Oracle 19c Enterprise Edition Release 19.0.0.0.0 – Production
Version 19.3.0.0.0
oracle> sqlplus sys/***@STANDBY as sysdba
SQL*Plus: Release 19.0.0.0.0 – Production on Wed May 13 18:58:41 2026
Version 19.3.0.0.0
Copyright (c) 1982, 2019, Oracle. All rights reserved.
Connected to:
Oracle 19c Enterprise Edition Release 19.0.0.0.0 – Production
Version 19.3.0.0.0
7. We restore the control file on the standby server
The first step is to restore the control file so that it points to the primary database service.
Here's a script you can use on your database
We create the script 01-restore_controlfile.sh and run it.
srvctl stop database -d $ORACLE_UNQNAME -o abort
rman target / << EOF
run{
startup nomount
restore standby controlfile from service «PRIMARY»;
}
exit
EOF
srvctl stop database -d $ORACLE_UNQNAME -o abort
srvctl start database -d $ORACLE_UNQNAME -o mount
oracle> sh -x ./01-restore_controlfile.sh
+ srvctl stop database -d UPGRDG -o abort
PRCC-1016 : UPGRDG has already been stopped
+ rman target /
Recovery Manager: Release 19.0.0.0.0 - Production on Fri May 15 05:16:12 2026
Version 19.3.0.0.0
Copyright (c) 1982, 2019, Oracle its affiliates. All rights reserved.
connected to target database (not started)
RMAN> 2> 3> 4>
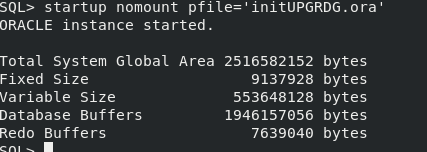
Oracle started
Total System Global Area 2516582152 bytes
Fixed Size 9137928 bytes
Variable Size 553648128 bytes
Database Buffers 1946157056 bytes
Redo Buffers 7639040 bytes
Starting restore at 15-MAY-26
using target database control file instead of recovery catalog
allocated channel: ORA_DISK_1
channel ORA_DISK_1: SID=44 device type=DISK
channel ORA_DISK_1: starting datafile backup set restore
channel ORA_DISK_1: using network backup set from service PRIMARY
channel ORA_DISK_1: restoring control file
channel ORA_DISK_1: restore complete, elapsed time: 00:00:06
output file name=+DATA/UPGRDG/CONTROLFILE/control01.ctl
output file name=+FRA/UPGRDG/CONTROLFILE/control02.ctl
Finished restore at 15-MAY-26
RMAN>
Recovery Manager complete.
+ srvctl stop database -d UPGRDG -o abort
PRCC-1016 : UPGRDG has already been stopped
+ srvctl start database -d UPGRDG -o mount
8. We restore the database using the service name.
To do this, we're going to create another script: 02_restore_db.sh. The databases must be in archivelog mode.
Important!! If your database is encrypted with TDE, you must copy the TDE from the primary database to the standby database before running the restore.
rman target sys/***@STANDBY << EOF
run{
allocate channel c1 type disk;
allocate channel c2 type disk;
allocate channel c3 type disk;
allocate channel c4 type disk;
allocate channel c5 type disk;
restore database from service «PRIMARY» section size 100G;
switch datafile all;
}
exit
EOF
srvctl status database -d $ORACLE_UNQNAME
<pre>oracle@oracle21dg> sh -x ./02_restore_db.sh
+ rman target sys/oracle@STANDBY
Recovery Manager: Release 19.0.0.0.0 - Production on Fri May 15 06:10:06 2026
Version 19.3.0.0.0
Copyright (c) 1982, 2019, Oracle and/or its affiliates. All rights reserved.
connected to target database: UPGR (DBID=369639787, not open)
RMAN> 2> 3> 4> 5> 6> 7> 8> 9>
using target database control file instead of recovery catalog
allocated channel: c1
channel c1: SID=42 device type=DISK
allocated channel: c2
channel c2: SID=1 device type=DISK
allocated channel: c3
channel c3: SID=45 device type=DISK
allocated channel: c4
channel c4: SID=44 device type=DISK
allocated channel: c5
channel c5: SID=52 device type=DISK
Starting restore at 15-MAY-26
channel c1: starting datafile backup set restore
channel c1: using network backup set from service PRIMARY
channel c1: specifying datafile(s) to restore from backup set
channel c1: restoring datafile 00001 to +DATA/UPGR/DATAFILE/system.271.1233295843
channel c1: restoring section 1 of 1
channel c2: starting datafile backup set restore
channel c2: using network backup set from service PRIMARY
channel c2: specifying datafile(s) to restore from backup set
channel c2: restoring datafile 00003 to +DATA/UPGR/DATAFILE/sysaux.266.1233295845
channel c2: restoring section 1 of 1
channel c3: starting datafile backup set restore
channel c3: using network backup set from service PRIMARY
channel c3: specifying datafile(s) to restore from backup set
channel c3: restoring datafile 00004 to +DATA/UPGR/DATAFILE/undotbs1.260.1233295849
channel c3: restoring section 1 of 1
channel c4: starting datafile backup set restore
channel c4: using network backup set from service PRIMARY
channel c4: specifying datafile(s) to restore from backup set
channel c4: restoring datafile 00005 to +DATA/UPGR/51692FD4BC27283DE065000000000001/DATAFILE/system.259.1233295861
channel c4: restoring section 1 of 1
channel c5: starting datafile backup set restore
channel c5: using network backup set from service PRIMARY
channel c5: specifying datafile(s) to restore from backup set
channel c5: restoring datafile 00006 to +DATA/UPGR/51692FD4BC27283DE065000000000001/DATAFILE/sysaux.273.1233295901
channel c5: restoring section 1 of 1
channel c3: restore complete, elapsed time: 00:01:36
channel c3: starting datafile backup set restore
channel c3: using network backup set from service PRIMARY
channel c3: specifying datafile(s) to restore from backup set
channel c3: restoring datafile 00007 to +DATA/UPGR/DATAFILE/users.272.1233295949
channel c3: restoring section 1 of 1
channel c3: restore complete, elapsed time: 00:00:50
channel c3: starting datafile backup set restore
channel c3: using network backup set from service PRIMARY
channel c3: specifying datafile(s) to restore from backup set
channel c3: restoring datafile 00008 to +DATA/UPGR/51692FD4BC27283DE065000000000001/DATAFILE/undotbs1.265.1233296003
channel c3: restoring section 1 of 1
channel c3: restore complete, elapsed time: 00:01:45
channel c3: starting datafile backup set restore
channel c3: using network backup set from service PRIMARY
channel c3: specifying datafile(s) to restore from backup set
channel c3: restoring datafile 00009 to +DATA/UPGR/5169EC3316F93919E065000000000001/DATAFILE/system.270.1233296115
channel c3: restoring section 1 of 1
channel c4: restore complete, elapsed time: 00:04:30
channel c4: starting datafile backup set restore
channel c4: using network backup set from service PRIMARY
channel c4: specifying datafile(s) to restore from backup set
channel c4: restoring datafile 00010 to +DATA/UPGR/5169EC3316F93919E065000000000001/DATAFILE/sysaux.269.1233296135
channel c4: restoring section 1 of 1
channel c5: restore complete, elapsed time: 00:04:23
channel c5: starting datafile backup set restore
channel c5: using network backup set from service PRIMARY
channel c5: specifying datafile(s) to restore from backup set
channel c5: restoring datafile 00011 to +DATA/UPGR/5169EC3316F93919E065000000000001/DATAFILE/undotbs1.268.1233296153
channel c5: restoring section 1 of 1
channel c2: restore complete, elapsed time: 00:06:55
channel c2: starting datafile backup set restore
channel c2: using network backup set from service PRIMARY
channel c2: specifying datafile(s) to restore from backup set
channel c2: restoring datafile 00012 to +DATA/UPGR/5169EC3316F93919E065000000000001/DATAFILE/users.267.1233296263
channel c2: restoring section 1 of 1
channel c5: restore complete, elapsed time: 00:02:06
channel c2: restore complete, elapsed time: 00:00:44
channel c3: restore complete, elapsed time: 00:03:39
channel c1: restore complete, elapsed time: 00:08:36
channel c4: restore complete, elapsed time: 00:03:48
Finished restore at 15-MAY-26
released channel: c1
released channel: c2
released channel: c3
released channel: c4
released channel: c5
RMAN>
Recovery Manager complete.
+ srvctl status database -d UPGRDG
La base de datos no se está ejecutando.
</pre>
9. Clear log file
All redo logs and standby redo logs are flushed to bring them in line with the new (standby) database,
We create a file named 03-clear_online.sql and run it on the standy database.
begin
for log_cur in (select group# group_no from v$standby_log)
loop
execute immediate ‘alter database clear logfile group ‘||log_cur.group_no;
end loop;
end;
/
SQL> @03_clear_online.sql

PL/SQL procedure successfully completed.

/
PL/SQL procedure successfully completed.
9. Data Broker Configuration
To centralize and simplify a Data Guard environment, it is highly recommended to configure Oracle Data Guard . Otherwise, all tasks must be performed manually.
Standby
ALTER SYSTEM SET dg_broker_config_file1='+DATA/UPGRDG/dr1.dat' scope=both sid='*';
ALTER SYSTEM SET dg_broker_config_file2='+FRA/UPGRDG/dr2.dat' scope=both sid='*';
SQL> show parameter broker

NAME				     TYPE     VALUE
------------------------------------ ----------- ------------------------------
connection_brokers		     string     ((TYPE=DEDICATED)(BROKERS=1)),
                          ((TYPE=EMON)(BROKERS=1))
dg_broker_config_file1		     string oracle
                         _1/dbs/dr1UPGR.dat
dg_broker_config_file2             string oracle
                         _1/dbs/dr2UPGR.dat
dg_broker_start              boolean	 FALSE
use_dedicated_broker             boolean     FALSE
SQL> alter system set dg_broker_config_file1='+DATA/UPGRDG/dr1.dat' scope=both sid='*';

alter system set dg_broker_config_file2='+FRA/UPGRDG/dr2.dat' scope=both sid='*';
System altered.

SQL> SQL>

System altered.

SQL> show parameter broker

NAME				     TYPE     VALUE
------------------------------------ ----------- ------------------------------
connection_brokers		     string     ((TYPE=DEDICATED)(BROKERS=1)),
                          ((TYPE=EMON)(BROKERS=1))
dg_broker_config_file1             string	 +DATA/UPGRDG/dr1.dat
dg_broker_config_file2             string     +FRA/UPGRDG/dr2.dat
dg_broker_start              boolean     FALSE
use_dedicated_broker             boolean     FALSE
SQL>
Primary
ALTER SYSTEM SET dg_broker_config_file1='+DATA/UPGR/dr1.dat' scope=both sid='*';
ALTER SYSTEM SET dg_broker_config_file2='+FRA/UPGR/dr2.dat' scope=both sid='*';
SQL> show parameter broker

NAME				     TYPE     VALUE
------------------------------------ ----------- ------------------------------
connection_brokers		     string     ((TYPE=DEDICATED)(BROKERS=1)),
                          ((TYPE=EMON)(BROKERS=1))
dg_broker_config_file1		     string oracle
                         _1/dbs/dr1UPGR.dat
dg_broker_config_file2             string oracle
                         _1/dbs/dr2UPGR.dat
dg_broker_start              boolean	 FALSE
use_dedicated_broker             boolean     FALSE
SQL> alter system set dg_broker_config_file1='+DATA/UPGRDG/dr1.dat' scope=both sid='*';

alter system set dg_broker_config_file2='+FRA/UPGRDG/dr2.dat' scope=both sid='*';
System altered.

SQL> SQL>

System altered.

SQL> show parameter broker

NAME				     TYPE     VALUE
------------------------------------ ----------- ------------------------------
connection_brokers		     string     ((TYPE=DEDICATED)(BROKERS=1)),
                          ((TYPE=EMON)(BROKERS=1))
dg_broker_config_file1             string 	 +DATA/UPGRDG/dr1.dat
dg_broker_config_file2             string     +FRA/UPGRDG/dr2.dat
dg_broker_start              boolean     FALSE
use_dedicated_broker             boolean     FALSE
SQL>
We enabled Oracle Broker on both databases.
Standby
SQL> alter system set dg_broker_start=true scope=both sid=’*’;
SQL> alter system register;
Primary
SQL> alter system set dg_broker_start=true scope=both sid='*';
We register the databases in Oracle Data Guard Broker as follows:
Primary: dgmgrl
connectpassword as sysdba
CREATE CONFIGURATION dgconfigUPGR AS PRIMARY DATABASE IS UPGR CONNECT IDENTIFIER IS PRIMARY;
ADD DATABASE ‘UPGRDG’ AS CONNECT IDENTIFIER IS ‘STANDBY’;
show configuration;
dgmgrl
DGMGRL for Linux: Release 19.0.0.0.0 – Production on Fri May 15 15:37:59 2026
Version 19.3.0.0.0
Welcome to DGMGRL, type “help” for information.
DGMGRL> connect sys/***@PRIMARY as sysdba
Connected to “UPGR”
Connected as SYSDBA.
DGMGRL> CREATE CONFIGURATION dgconfigUPGR AS PRIMARY DATABASE IS UPGR CONNECT IDENTIFIER IS PRIMARY;
Configuration “dgconfigupgr” created with primary database “upgr”
ADD DATABASE ‘UPGRDG’ AS CONNECT IDENTIFIER IS ‘STANDBY’;
Database “UPGRDG” added
DGMGRL> show configuration
Configuration – dgconfigupgr
Protection Mode: MaxPerformance
Members:
upgr – Primary database
UPGRDG – Physical standby database
Fast-Start Failover: Disabled
Configuration Status:
DISABLED
Before enabling the setting, it is recommended that you restart the standby database.
srvctl stop database -d UPGRDG
srvctl start database -d UPGRDG -o mount
Now all that's left is to enable the oracle data guard configuration using the ` enable configuration` command;
DGMGRL> enable configuration;
Enabled.
We verified that everything is correct; the status is SUCCESS.
DGMGRL> show configuration
Configuration – dgconfigupgr
Protection Mode: MaxPerformance
Members:
upgr – Primary database
UPGRDG – Physical standby database
Fast-Start Failover: Disabled
Configuration Status:
SUCCESS ( status updated 38 seconds ago)
In this post set up a single-instance database, but the steps are also valid for a RAC environment; you'll just need to adjust the RAC-specific settings in the init.ora file—the rest of the steps are similar.