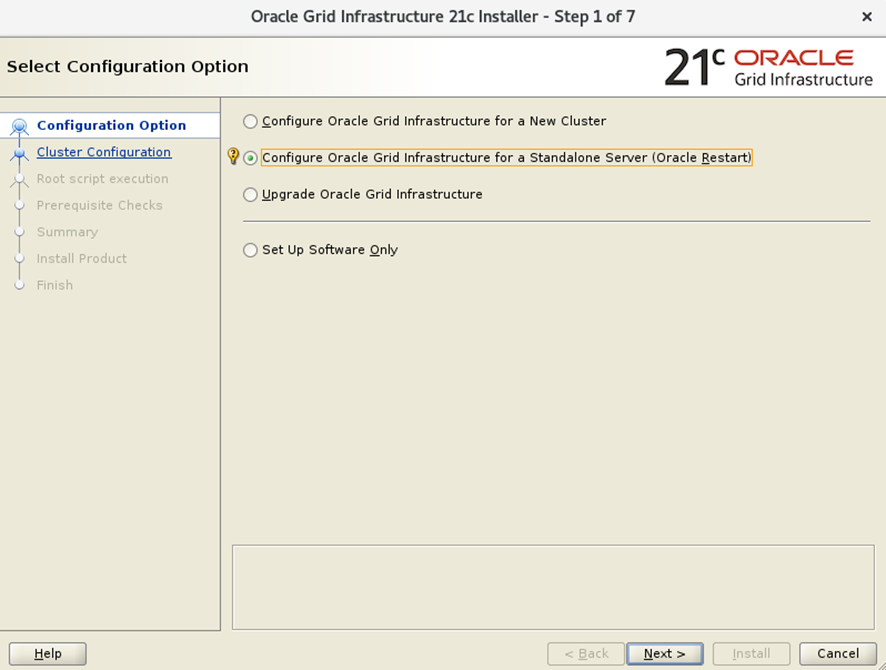
On this page, we will explain how to install a Grid infrastructure, in this case Oracle 21c on Oracle Linux with ASM udev). The installation is performed on a single server.
In this case we start from the following configuration:
Memory: 9G
Operating system: Linux .
1 software disk, software GB
2 data disks, 25G.
2 disks, 15G each, for the FRA (Flash Recovery Area).
Steps:
OPERATING SYSTEM CONFIGURATION - HOST NAME / IP ADDRESS
Before beginning the installation, it is necessary to make a series of configurations in our architecture that are as suitable as possible in order to launch the installation of the Oracle binaries Oracle the best possible way, whether it be the Oracle Infrastructure part or the Oracle part.
First, we must make modifications to the /etc/hosts file to enter the IP and the name of the machine where the installation will be performed.

In this document you can check the minimum requirements needed to perform the installation:
Download Software
We are going to download the Linux binaries that will be installed later. We need to download both the Grid Infrastructure binaries and the database binaries.
They can be downloaded from the following address:
https://www.oracle.com/database/technologies/oracle21c-linux-downloads.html
The binaries are as follows (you can download the rpm the installers—in this case, the installers)
LINUX.X64_213000_db_home.zip (Oracle 21.3)
LINUX.X64_213000_grid_home.zip (Oracle 21.3)
Installation Packages
Before beginning the installation, we must ensure that we have installed the necessary packages to install both Oracle and database binaries. This can be done automatically or manually.
Automatic installation
In our case, we're going to install the packages automatically as follows. As root, run the following command:
dnf install oracle
If there are any issues, we can download the rpm the following link and install them manually:
https://yum.oracle.com/repo/OracleLinux/OL8/appstream/x86_64/index.html
If you have not usedoracle to install all the prerequisites, you will need to perform the following tasks manually before performing a clean installation:
DISK SPACE AND SWAP
Temporary space, SWAP memory and huge pages configuration (optional, recommended).
| WAP | If the RAM memory is between 4 and 16 GB, the SWAP will be equal to the size of the RAM memory. If the RAM memory is larger than 16 GB, the SWAP will be 16 GB. |
| /tmp | At least 1 GB free in the /tmp filesystem |
| /u01 | At least 80 GB. In this FS will go the binaries of the GRID and RDBMS infrastructure. |
It is a good idea to check that huge pages are correctly configured to accommodate all the SGAs of the databases that we are going to deploy on the server, including the memory used by the Grid ASM database, although this configuration is not mandatory.
Add the following lines to the file "/etc/sysctl.conf" or to the file "oracle.conf."
fs.file-max = 6815744
kernel.sem = 250 32000 100 128
kernel.shmmni = 4096
kernel.shmall = 1073741824
kernel.shmmax = 4398046511104
kernel.panic_on_oops = 1
net.core.rmem_default = 262144
net.core.rmem_max = 4194304
net.core.wmem_default = 262144
net.core.wmem_max = 1048576
net.ipv4.conf.all.rp_filter = 2
net.ipv4.conf.default.rp_filter = 2
fs.aio-max-nr = 1048576
net.ipv4.ip_local_port_range = 9000 65500
As root run the following command for the kernel level changes to take effect.
/sbin/sysctl -p
/sbin/sysctl -p /etc/sysctl.oracle.conf
Add the following parameters to the file named "/etc/security/limits.oracle.conf".
oracle  soft   nofile    1024
oracle  hard   nofile    65536
oracle   nproc    16384
oracle   nproc    16384
oracle  soft   stack    10240
oracle   stack    32768
oracle   memlock    134217728
oracle  soft   memlock    134217728
oracle  soft   data    unlimited
oracle  hard   data    unlimited
Manually install the following packages that are required for the installation:
dnf install  bc
dnf install  binutils
dnf install  compat-openssl10
dnf install  elfutils-libelf
dnf install  glibc
dnf install  glibc-devel
dnf install  ksh
dnf install  libaio
dnf install  libXrender
dnf install  libX11
dnf install  libXau
dnf install  libXi
dnf install  libXtst
dnf install  libgcc
dnf install  libnsl
dnf install  libstdc++
dnf install  libxcb
dnf install  libibverbs
dnf install  make
dnf install  policycoreutils
dnf install  policycoreutils-python-utils
dnf install  smartmontools
dnf install  sysstat
If you have not created the groups and users, you must do so before beginning the installation. You can perform the installation with two users (grid for the Infrastructure part, oracle Database), or use the same user (oracle) for both installations. In this test environment, we will use oracle both installations.
grouporacle
-g 54321 oinstall
groupadd -g 54322 dba
groupadd -g 54323 oper
#groupadd -g 54324 backupdba
#groupadd -g 54325 dgdba
#groupadd -g 54326 kmdba
#groupadd -g 54327 asmdba
#groupadd -g 54328 asmoper
#groupadd -g 54329 asmadmin
#groupadd -g 54330 racdba

useradd -u 54321 -g oinstall -G dba,asmdba,backupdba,dgdba,kmdba,racdba oracle
useradd -u 54322 -g oinstall -G asmadmin,asmdba,racdba oracle
DIRECTORY CREATION
If this is the first time the installation is being performed, we must create the necessary directories to begin the installation. To do this, we need to create the Oracle and Oracle directories, as well as the installation's own directories.
In our case, we are going to perform the installation on the directory:
oracle.0.0
[oracle] mkdir -poracle
[oracle oracle] mkdir -poracle.0.0/grid
[oracle oracle] mkdir -poracle.0.oracle
Installing the software Infrastructure software
At this point, we can begin installing the software. First, we will install the software Infrastructure software (oracle.0.0/grid). To start the installation, run the following command:
We launch the installation as follows:
[oracle grid]$ ./gridSetup.sh
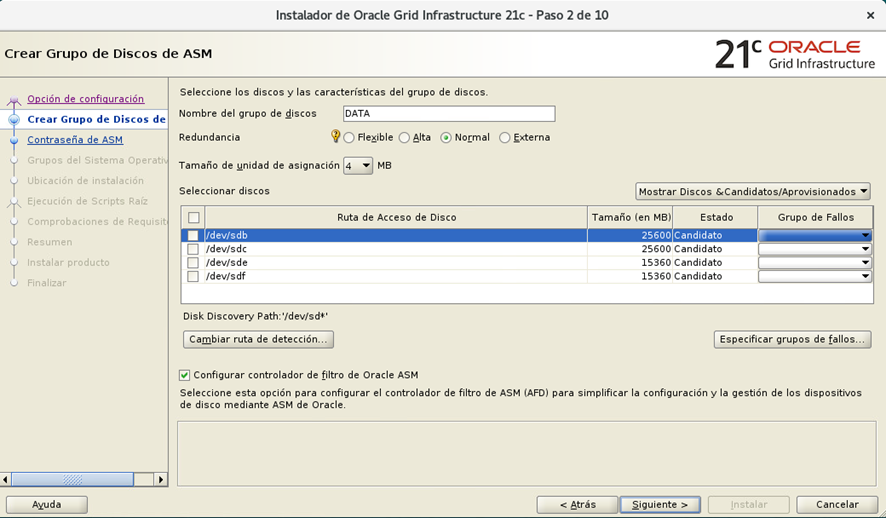
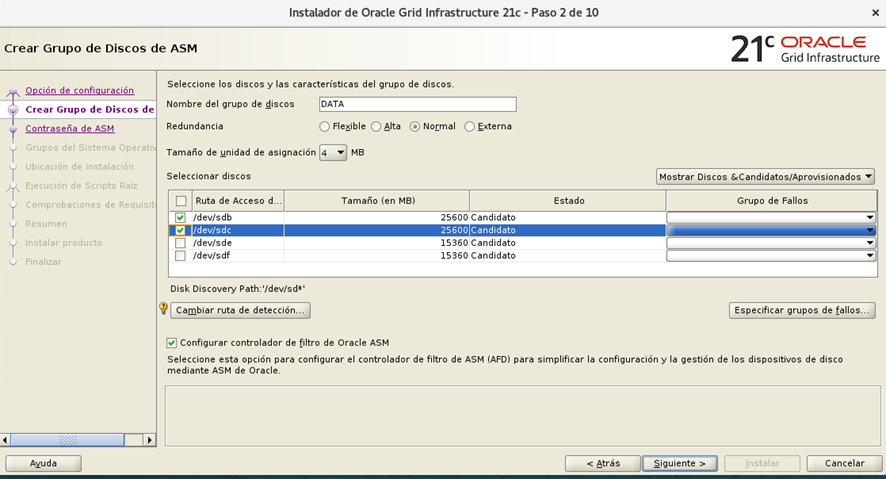
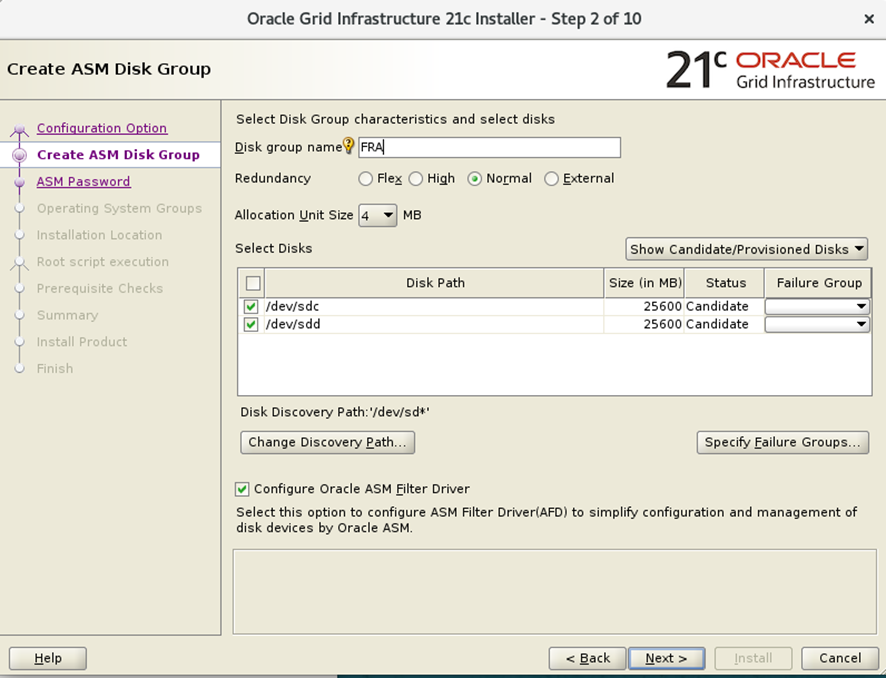
In our case we chose Normal redundancy in the diskgroups. Therefore, we must choose disks of the same size, otherwise you will receive an error indicating this situation.

In this case we have 2 disks of 25Gb for data that we will choose for the disgroup that we will call DATA and 2 of 15Gb for the recovery area or FRA.
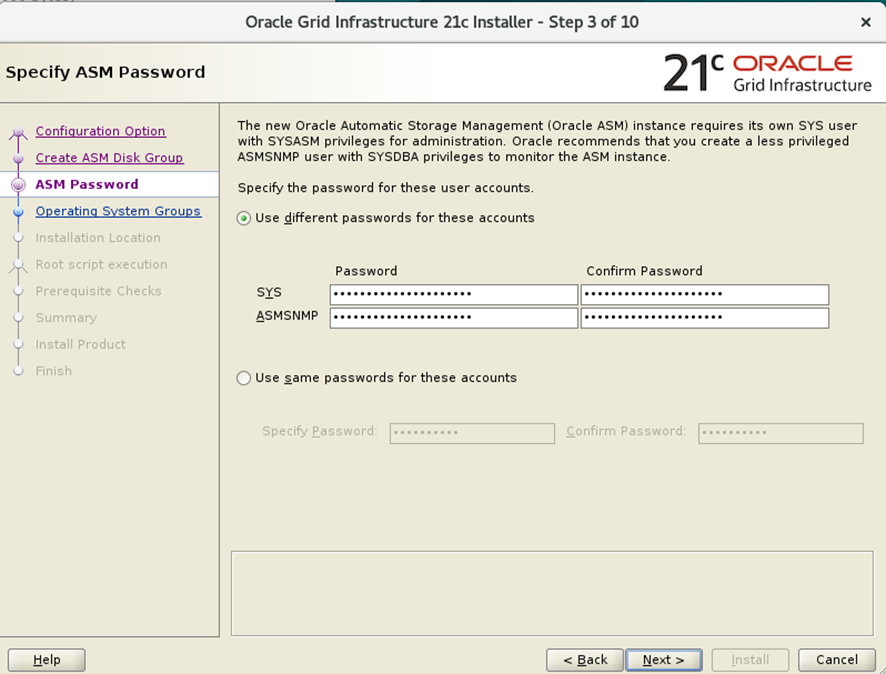
Enter the password SYS / ASMSNMP. It can be different or the same.
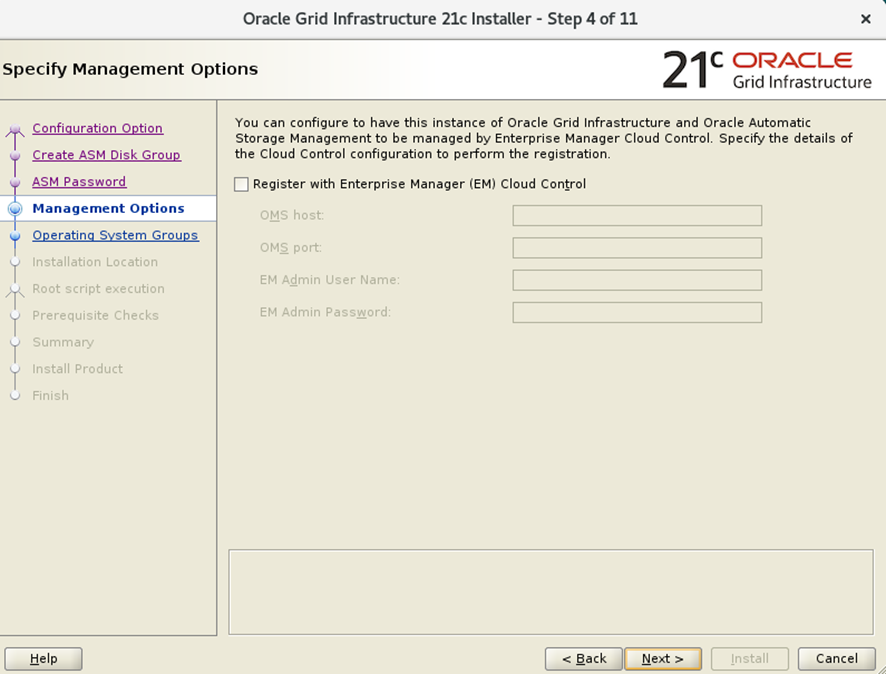
Configuration screen, registration in Oracle Manager. Leave it blank; you can configure it later if necessary.
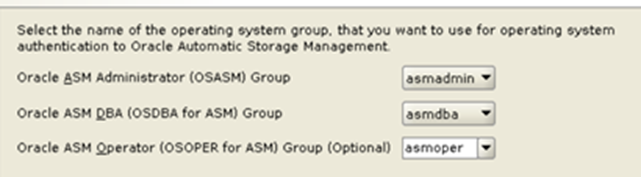
SSOO privileges SSOO the various groups in the SSOO .
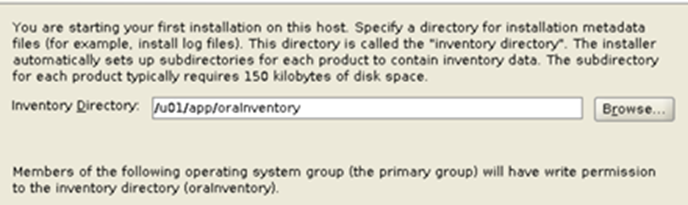
We specify the location of Oracle .
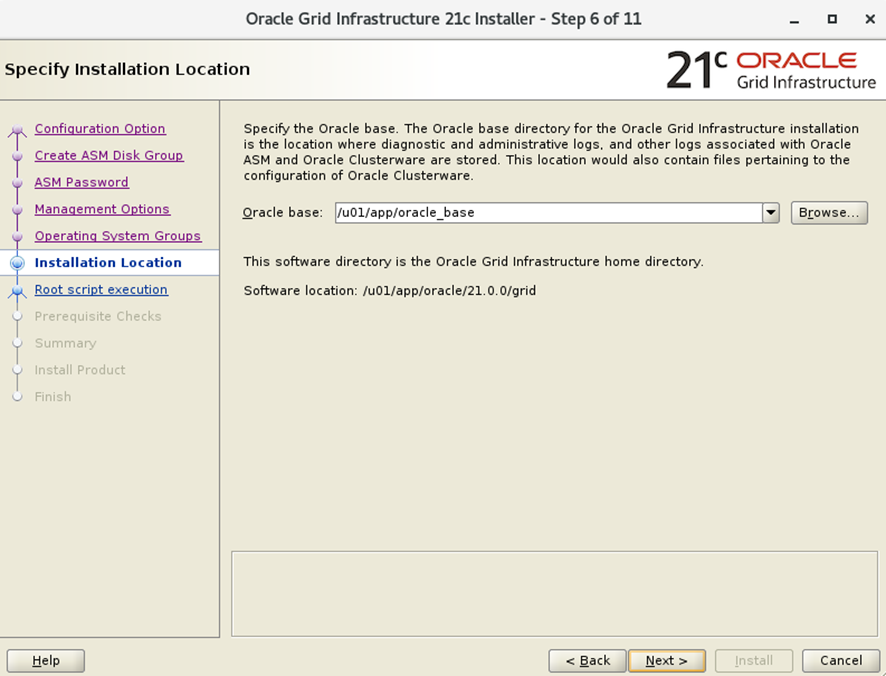
Oracle location:
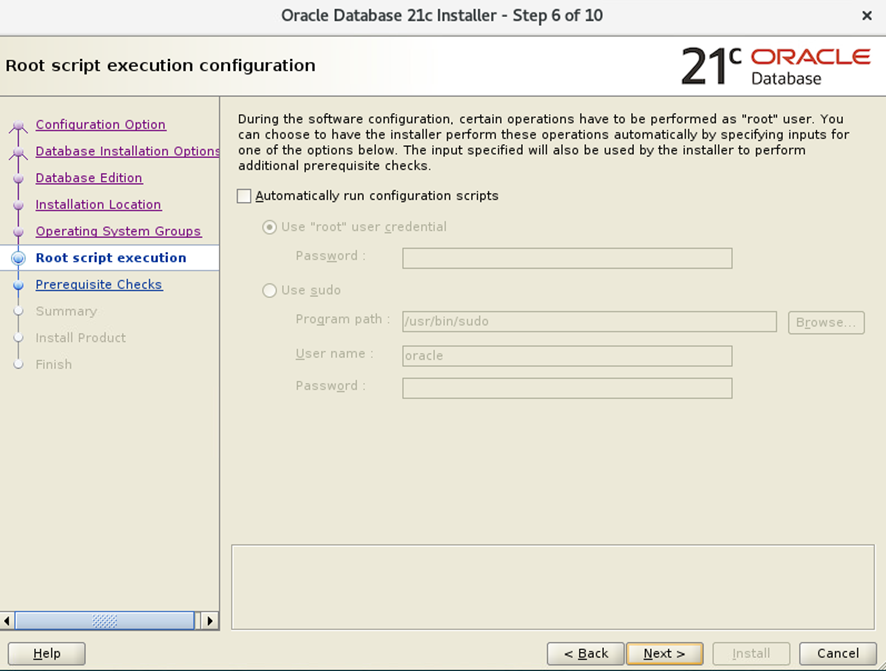
At this point, we can enter the root credentials so that the operations required to configure the environment are performed automatically. In this case, we uncheck the installation option to run the configuration scripts manually once the software installation is complete.
The installer verifies that all the prerequisites of the installation are correct, indicating us if some prerequisite is not fulfilled so that it is corrected, although there is an option to obviate them, it is recommended to solve the problems that the installation is indicating us to make a "clean" installation and to avoid later problems.
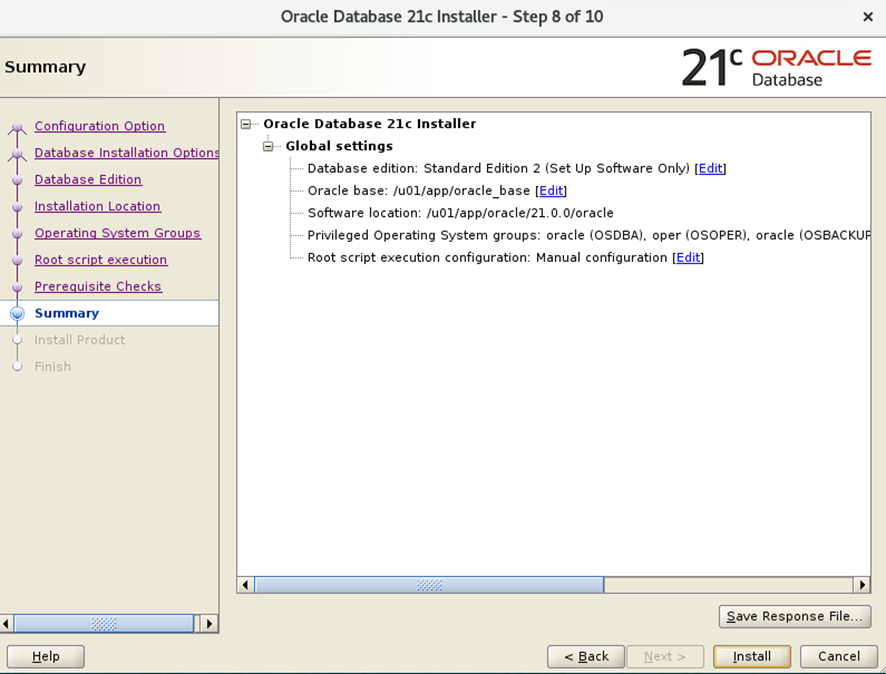
Installation summary:
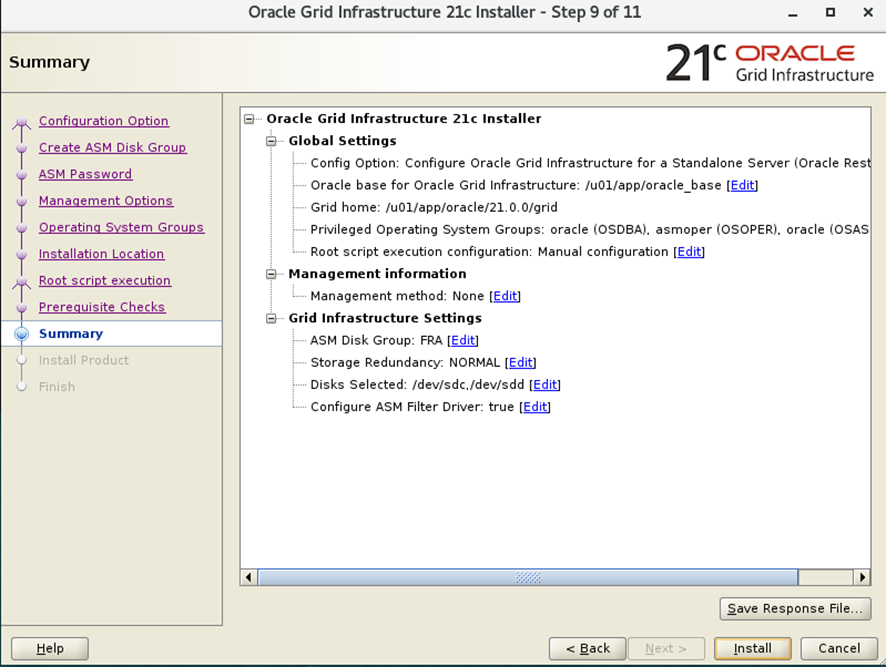
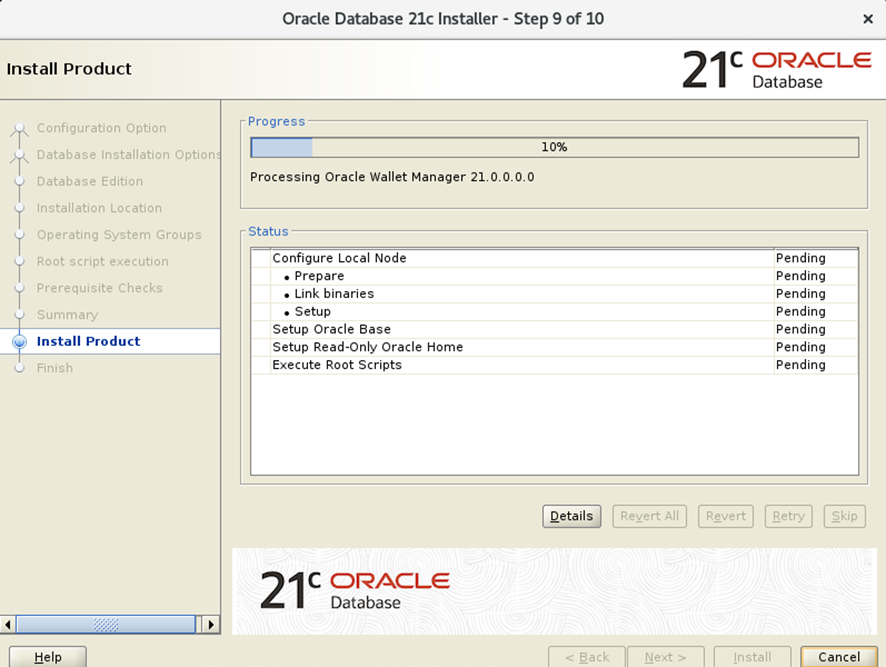
We launch the installation. The installer will indicate the progress.
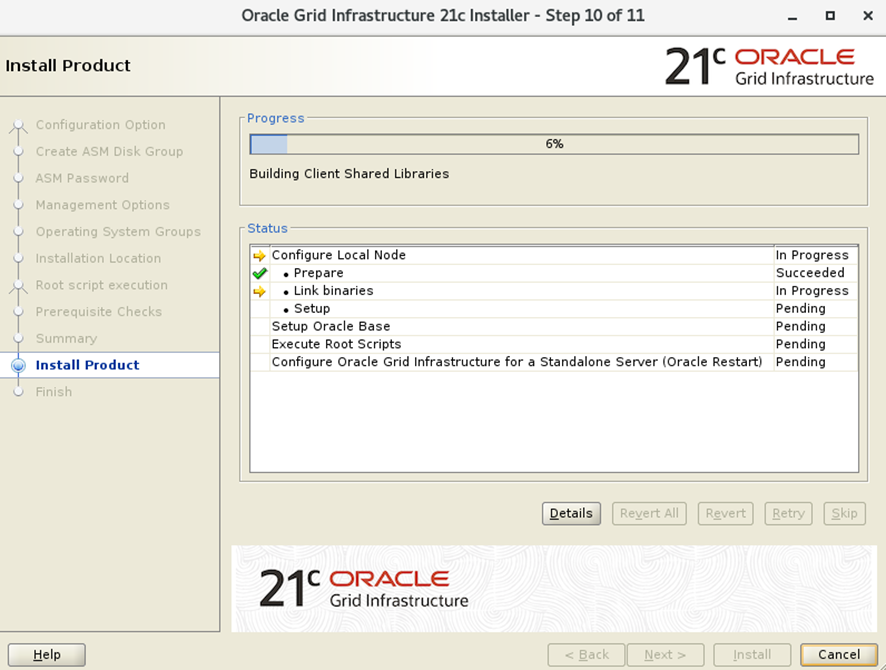
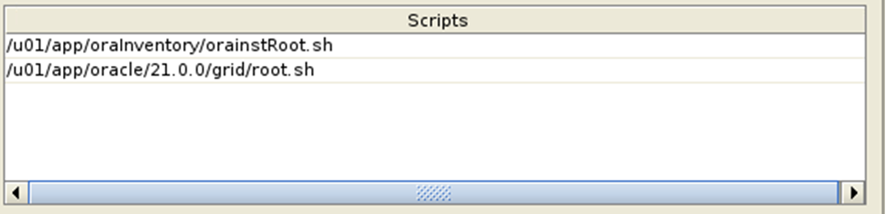
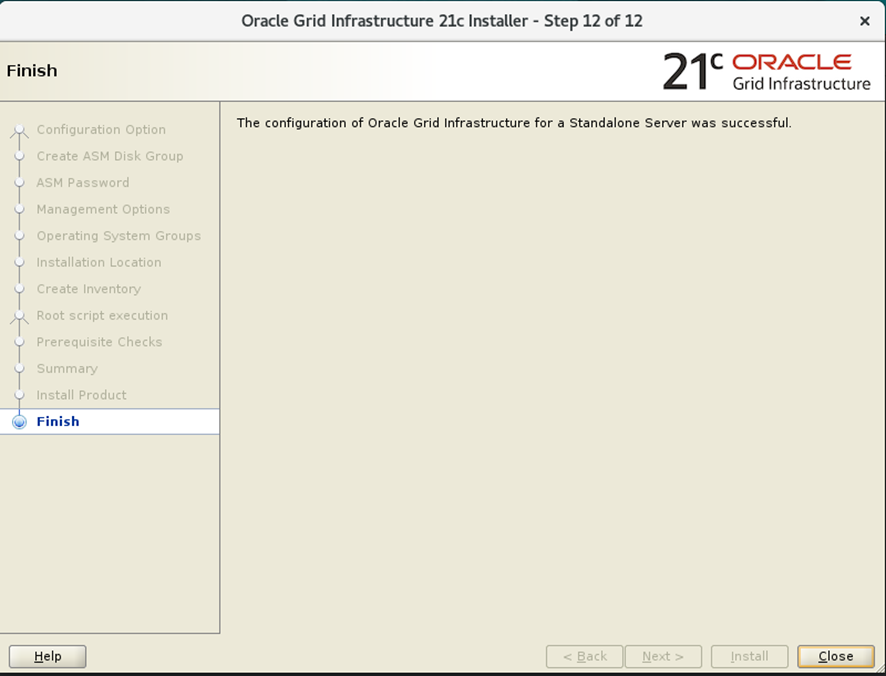
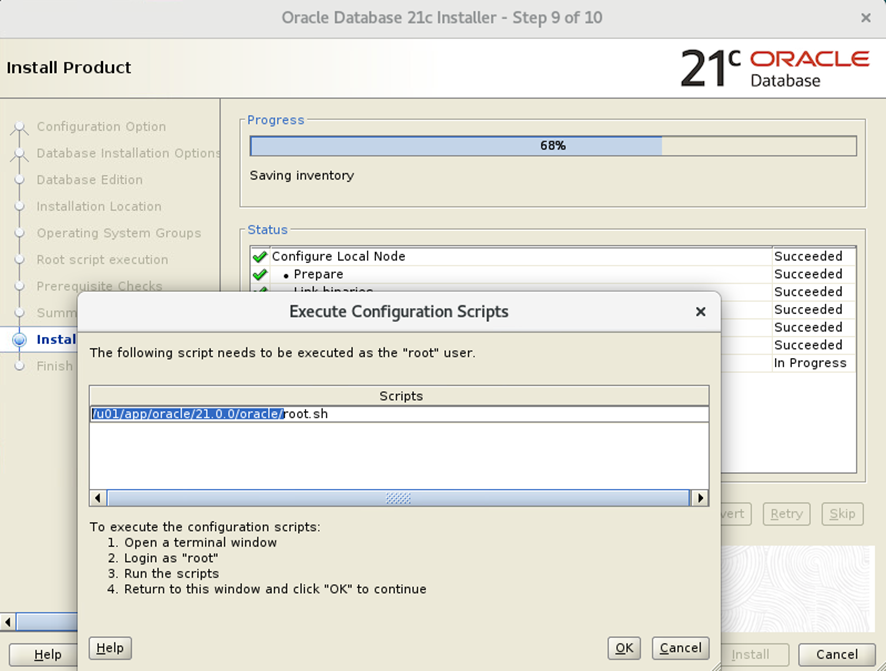
When it finishes it will ask us to execute the configuration scripts (root), since previously we did not indicate the credentials of this user.
Once executed, the last screen will be displayed indicating that the installation has been successfully completed.
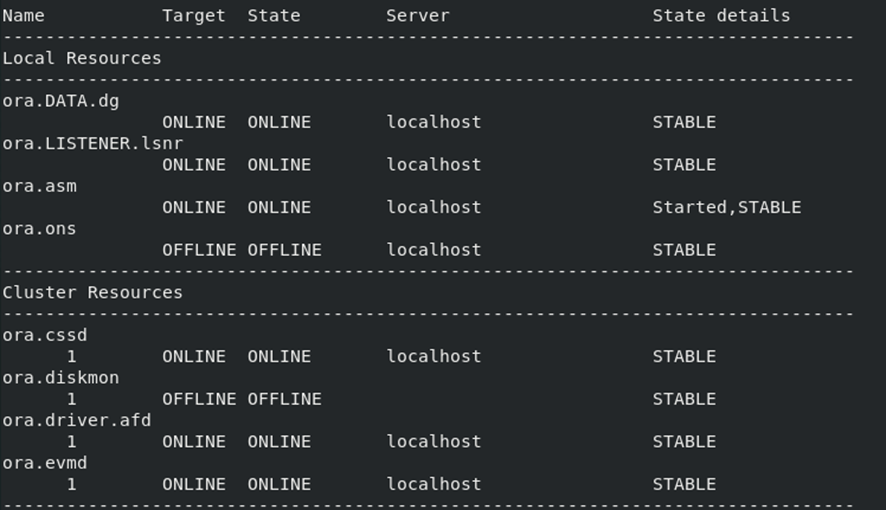
With this command oracle.0.0/grid/bin/crsctl status res -t, you can verify that the installation was successful. You will receive output very similar to this.
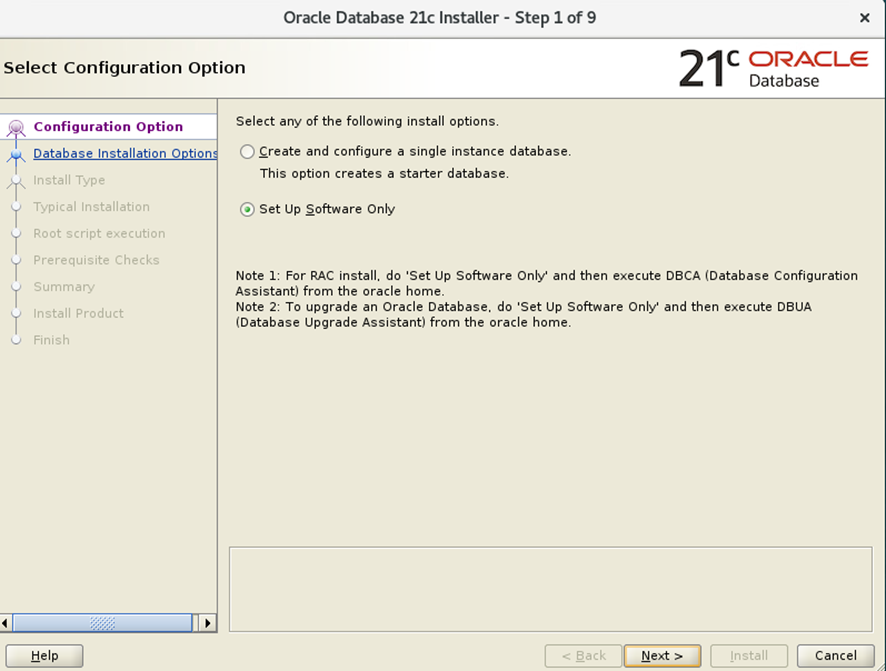
Installing the software
First, we decompress the following .zip file with the user oracle
unzip LINUX.X64_213000_db_home.zip
Once the software has been extracted, run the installer as follows:
[oracle oracle]$ ./runInstaller
In this screen, we choose the second option:
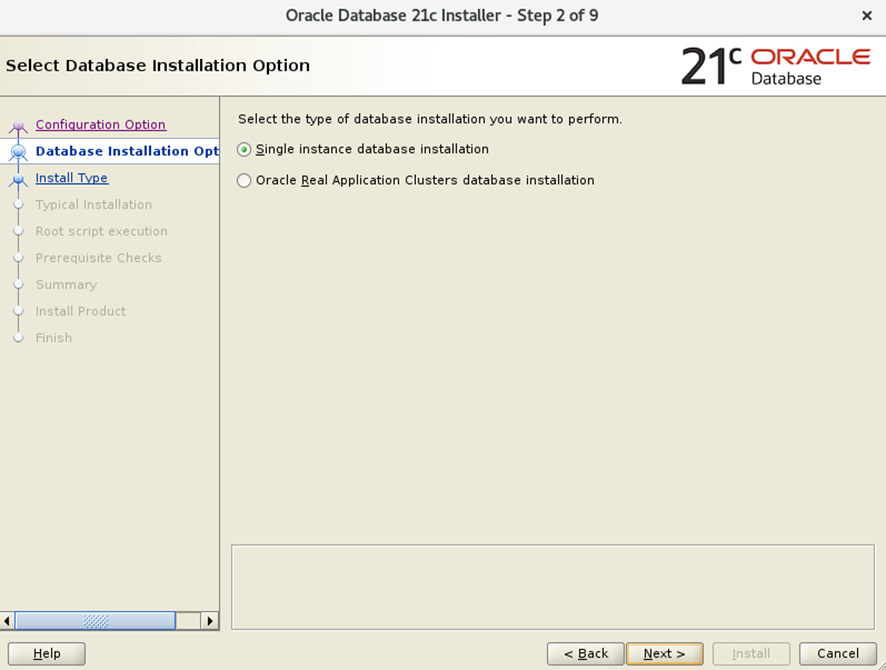
We chose the first option:
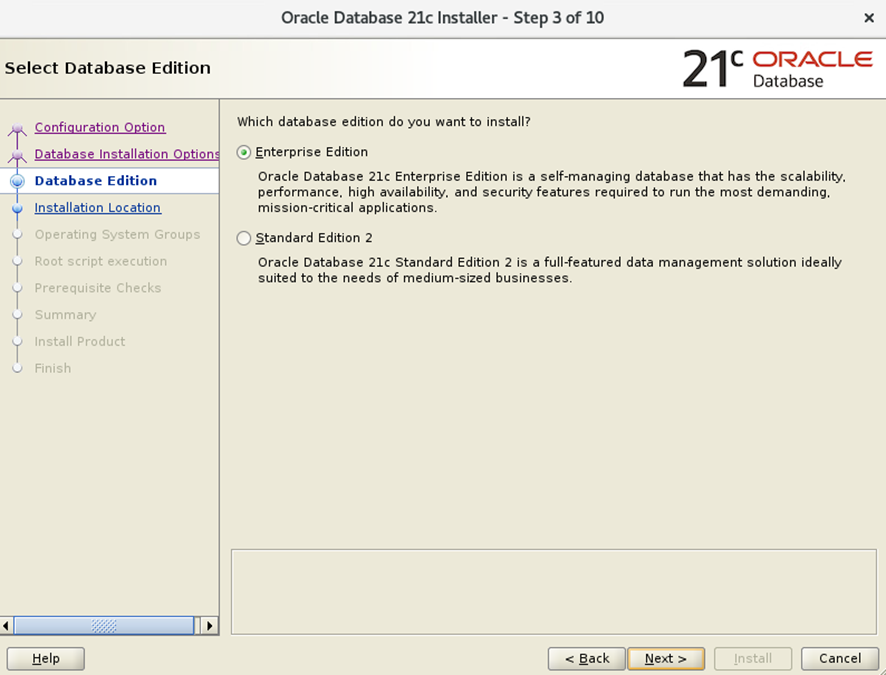
Choose the Enterprise Edition option.
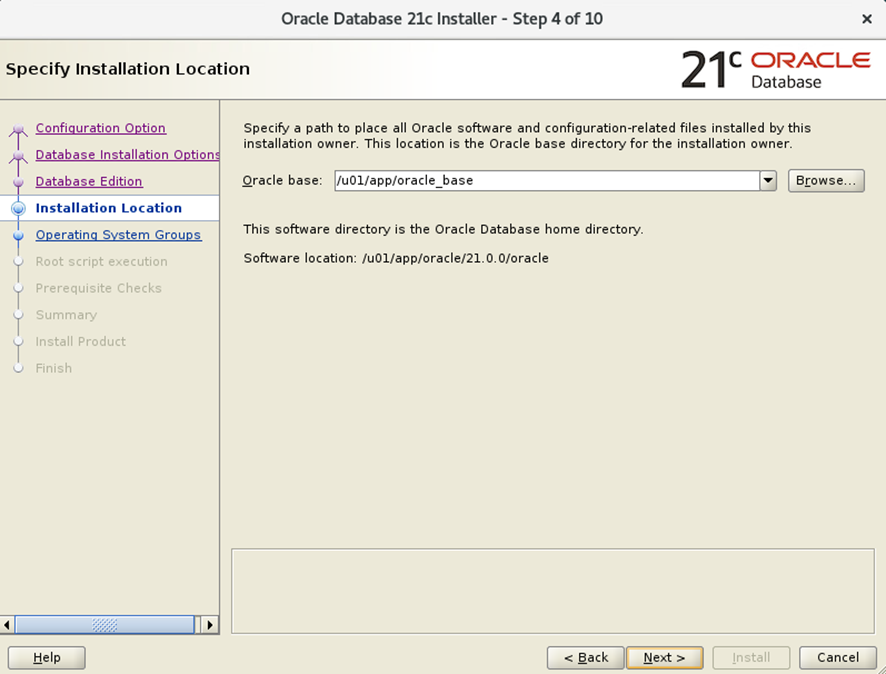
Now we choose the location of Oracle .
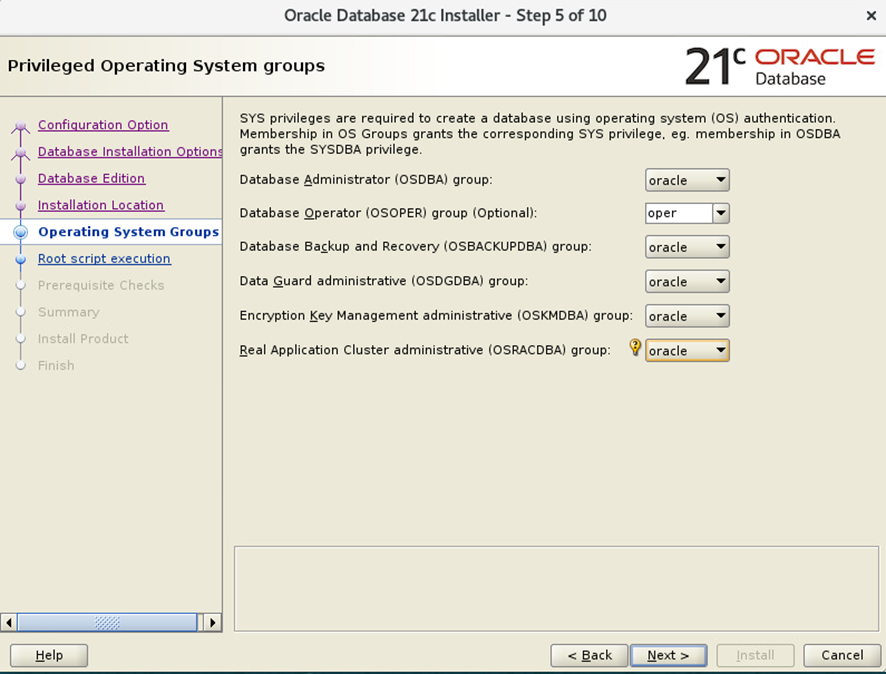
We leave the default users:
These data are left blank.
Once the prerequisites have been passed, this screen will appear:
Installation progress:
Once the installation is finished, we run the configuration script with root.
With these steps we reach the end of the installation.